Nginx Configuration
The next step is to modify the Nginx config file so that Nginx uses our SSL certificates and routes requests on to JupyterHub.
The Nginx configuration step was the hardest part for me when I set up the first JupyterHub server. The Nginx config file isn't Python code or a bash script. I went through many different configurations until I finally got one that worked.
The big initial problem was that I copied the sample Nginx config that's up on the JupyterHub docs. But the Nginx config posted on the JupyterHub docs is not a complete Nginx config, it contains just the server portion. I didn't know that the whole server portion needed to be enclosed in another frame.
Determine number of cores and core limitations
According to this tutorial from Digital Ocean, you can determine the number of cores running on your server and what the limits of those cores are with a couple commands. Information about our server's cores will be put in the Nginx configuration later.
The first command determines the number of cores on the server:
$ grep processor /proc/cpuinfo | wc -l
If this command returns 1 then we have 1 core on your server. Then 1 is the number of worker_processes to set in our Nginx configuration
The second command determines the core's limitations:
$ ulimit -n
If this command returns 1024, then that's the number of worker_connections we should set in our Nginx configuration.
Based on the results of these two commands, we will modify the top of the nginx.conf file
worker_processes 1;
worker_connections 1024;
Modify nginx.conf
To modify nginx.conf, cd into the /etc/nginx directory. The nginx.conf file should be there along with a couple other files and directories.
$ cd /etc/nginx
$ ls
conf.d          koi-utf     nginx.conf    sites-available  ssl
fastcgi.conf    koi-win     proxy_params  sites-enabled    uwsgi_params
fastcgi_params  mime.types  scgi_params   snippets         win-utf
$ sudo nano nginx.conf
At the top of the file, paste in our information about worker_processes and worker_connections
user www-data;
worker_processes 1;
pid /run/nginx.pid;
include /etc/nginx/modules-enabled/*.conf;

events {
        worker_connections 1024;
        # multi_accept on;
}
...
Close the configuration file (using [Ctrl]+[x], [y]) and restart Nginx. Check the status to make sure Nginx is active
$ sudo systemctl restart nginx
$ sudo systemctl status nginx
You should see that Nginx is activate and running.
Next we will add a map block to the nginx.conf file to ensure http connections are upgraded. In nginx.conf find the lines:
...
include /etc/nginx/mime.types;
default_type application/octet-stream;
...
Replace the block above with the block below:
...
include /etc/nginx/mime.types;
default_type application/octet-stream;

map $http_upgrade $connection_upgrade {
   default upgrade;
   '' close;
   }
...
Save the nginx.conf file and restart Nginx again and check the status:
$ sudo systemctl restart nginx
$ sudo systemctl status nginx
Nginx should be running fine with no errors.
Modify sites-available
According to this tutorial and [this tutorial], we should modify the sites-available file and create a symbolic link to the sites-enabled file. The nginx.conf file shows that it will include /etc/nginx/sites-enabled/*.
Open a new file in /etc/nginx/sites-available called jupyterhub
$ sudo nano /etc/nginx/sites-available/jupyterhub
Paste the following server blocks into the file:
# /etc/nginx/sites-available/jupyterhub

    # All regular http requests on port 80 become SSL/HTTPS requests on port 32
    server {
        listen 80;
        server_name mydomain.org;
        # Tell all requests to port 80 to be 302 redirected to HTTPS
        return 302 https://$host$request_uri;
    }

    server {
        #listen 443 ssl default_server;
        listen 443;
        ssl on;
        # !!! make sure to change to your domain name !!!
        server_name engr101lab.org;
        ## SSL Protocals
        ssl_certificate /etc/letsencrypt/live/engr101lab.org/fullchain.pem;
        ssl_certificate_key /etc/letsencrypt/live/engr101lab.org/privkey.pem;
        ssl_protocols TLSv1 TLSv1.1 TLSv1.2;
        ssl_prefer_server_ciphers on;
        ssl_dhparam /srv/jupyterhub/dhparam.pem;
        # Make site accessible from http://localhost/ server_name localhost; certs sent to the client in SERVER HELLO are concatenated in
        ssl_session_timeout 1d;
        ssl_session_cache shared:SSL:50m;
        ssl_stapling on;
        ssl_stapling_verify on;
        # modern configuration. tweak to your needs.
        ssl_ciphers 'ECDHE-ECDSA-AES256-GCM-SHA384:ECDHE-RSA-AES256-GCM-SHA384:ECDHE-ECDSA-CHACHA20-POLY1305:ECDHE-RSA-CHACHA20-POLY1305:ECDHE-ECDSA-AES128-GCM-SHA256:ECDHE-ECDSA-AES256-SHA384:ECDHE-RSA-AES256-SHA384:ECDHE-ECDSA-AES128-SHA256:ECDHE-RSA-AES128-SHA256';
        # HSTS (ngx_http_headers_module is required) (15768000 seconds = 6 months)
        add_header Strict-Transport-Security max-age=15768000;

        location / {
            proxy_pass http://127.0.0.1:8000;
            proxy_set_header X-Real-IP $remote_addr;
            proxy_set_header Host $host;
            proxy_set_header X-Forwarded-For $proxy_add_x_forwarded_for;
            proxy_set_header X-NginX-Proxy true;
            #proxy_http_version 1.1;
            proxy_set_header Upgrade $http_upgrade;
            proxy_set_header Connection "upgrade";
        }
        location ~ /.well-known {
            allow all;
        }
    }
Save and close the `/etc/nginx/sites-available/jupyterhub file.
Link sites-available to sites-enabled
Now that we have a jupyterhub server configuration in the sites-available directory, we need to create a symbolic link to the sites-enabled directory so the server blocks we wrote will be run by Nginx.
To create the symbolic link, use the command below:
$ sudo ln -s /etc/nginx/sites-available/jupyterhub /etc/nginx/sites-enabled
Test out the new Nginx configuration
OK, fingers crossed... Now we are going to check if our Nginx configuration is valid and works correctly. First we can check for configuration errors with the command below:
$ sudo nginx -t
What we are looking for is output like below. If there are any errors, you need to go back and trouble shoot the Nginx configuration.
nginx: the configuration file /etc/nginx/nginx.conf syntax is ok
nginx: configuration file /etc/nginx/nginx.conf test is successful
Now restart Nginx and take a look at the status.
$ sudo systemctl restart nginx
$ sudo systemctl status nginx
# [Ctrl]+[c] to exit
We are looking for something like:
   Loaded: loaded (/lib/systemd/system/nginx.service; enabled; vendor preset: enabled)
   Active: active (running) since Thu 2019-02-07 00:40:10 UTC; 7s ago
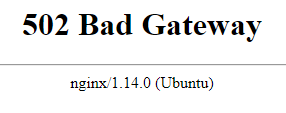
Now browse to the domain name we added to the server. If you use http://mydomain.org you should be re-directed to https://mydomain.org.
Since JupyterHub isn't hooked up to Nginx yet, you should see a 502 Bad Gateway Error. But that error should show nginx in the error text.
Summary
In this section we modified the nginx.conf file and created a server configuration in /etc/nginx/sites-available. Then we created a symbolic link betweeefile in sites-available to sites-enabled
Then we checked the Nginx configuration was valid and restarted Nginx.
Next Steps
The next step configure JupyterHub by creating and modifying a jupyterhub_config.py file.